Showing posts with label DIY. Show all posts

Friday, July 24, 2015

DIY | Repurposed Goat Feeder!


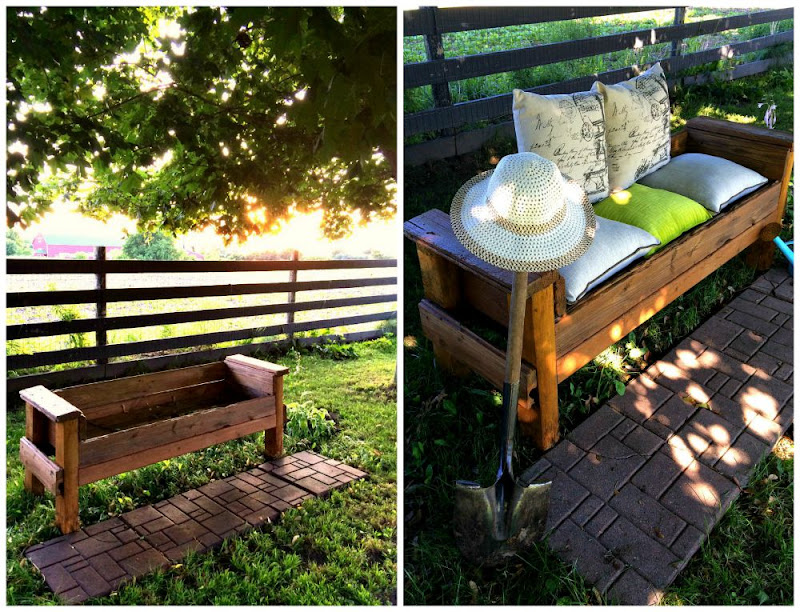
Back in spring, when we started cleaning the former goats and lambs' area in our property, I saw a this very heavy and very dirty wood goat feeder. The wheels inside my head started spinning! I knew i have to keep it and repurpose it into something useful for the veggie garden we are building. My dear poor hubby just stared and me and said : "Really? This? You know how dirty it is right?" I did not answer his questions but my smile and the twinkle in my eyes {as if I've seen a treasure} said it all!


Cleaning it was not a joke! It took several power washing, serious scrubbing, sanding and staining before I can finally say "That is what I want!". Thanks to my hubby who did 60% of the work :-)


It is so heavy that it took us several minutes to move it {we were literally moving it inch by inch because I can't lift my side of the bench and there's no way hubby can carry it by himself}. The perfect place for it is under the huge maple trees where there is abundant shade in the middle of the day and the perfrect vantage point when the sun is setting in the early evenings


Again keeping with the rustic theme of our veggie garden, we used whatever we have in the house to embellish our little nook under the maple trees. Hubby laid some broken stepping stones from previous project, while I took some throw pillows from the main house. We also planted some hostas on both sides of the bench and added a splash of color by placing an old water can which I got for a garage sale.


From trash to treasure .....


You can just imagine how thankful we are when admiring gorgeous sunset like this while sitting on our wooden bench that once a upon a time was a goat feeder to rescued goats.


Life is good!


Linking with: The Scoop
                    Treasure Hunt Thursday
                    Thursday Favorite Things


Sunday, November 16, 2014

DIY {Do It Yourself} | Table Napkin Rings


Four of my dear friends came over this weekend for an afternoon tea. While I was preparing my tea cups and other tea paraphernalia the night before the intimate get-together, I realized some of my table cloth napkins and rings are still in moving boxes stored in the workshop. Instead of rummaging the boxes, I went to my craft room and make table napkin rings.

My design inspiration came from this table runner in our dinning room.... the subtle but elegant colour combination and the white snowflake on burlap canvass are just perfect for the table setting I have in mind.


GATHER:


6 strips of Burlap { 2 1/2 inches width x 4 1/2 inches length per strip}
6 white buttons
6 small snowflake wood chips
frosted faux tree branches (I took some from our Christmas tree decor bought from Dollar Store)
Paper towel tubes ( cut 6 pieces - 2 inches in length per piece)
Glue gun

CREATE:


1. Tore a couple strings off of each side of the burlap strip to create fringe
2. Wrap the burlap strip around the paper towel tube
3. Using a glue gun, attach both ends of the burlap strip.


4-6. Embellish burlap ring with frosted faux tree branches


7. Glue snowflake wood chip on top of the assembled tree branches
8. Using a strand of the burlap, tie a simple knot on the button.
9. Finish the napkin ring by attaching the button on top of the snowflake wood chip.


If I may say, I really like the way these rings turned out. I can use it throughout the Holidays and because of the snowflake embellishment, these napkin rings will be present on the dinning table this coming winter season!


Linking with : Simple Saturdays Blog Hop Show & Tell Friday


Monday, October 20, 2014

DIY {Do It Yourself} | Fall Centerpiece


Fall colors are at its peak here at home. Almost all of our maple trees are now dressed in bright red, orange and vivid yellow.


I wanted to bring the colors and leaves inside the house so I made these inexpensive fall center pieces yesterday while waiting for my hubby to come home {he's been working for almost 48 hours training nurses and hospital staff on Ebola virus infection control}.

Project #1:


You need:
Small serving tray {use whatever you have in your kitchen}
8 small pumpkins
Fall leaves from the backyard {choose different vibrant colors}
Scented candle jar {again use whatever you have at home, I used my Bergamot woods scentend candle from Bath and Body Works Fall collection}
Ceramic bird figurines {optional, or use any figurines you have : owls, birds, ducks}

Easy Peasy:
1. Place the candle jar in the middle of the tray
2. Put pumpkins around the jar.
3. Embellish with fall leaves and bird figurines.

And voila ....


Project #2


Yuu need:
Small round wood tray {I bought mine from a thrift shop for $1.50}
Mason gar {or any vase}
Bunch of fall flowers
2 small pumpkins
Fall leaves from the backyard

Easy Peasy:
1. Arrange the fall flowers in a mason jar.
2. Place the mason jar on the round tray.
3. Embellish with pumpkins and fall leaves.


As I always say, the kitchen is an excellent source of  materials to decorate our home. It also won't hurt to go outside and bring some of  nature's wonders inside!

Have a fantastic week!


Linking with : Tilly's Nest


Related Posts Plugin for WordPress, Blogger...